Super Swanky Purse Patterns

Looking for the perfect purse this season? These swanky satchels are sure to sass up your handmade wardrobe.

**This Post Contains Affiliate Links*

5

img_7018-1

PIN IT ON PINTEREST

Hooked Hazel’s Boardwalk Clutch

navyboardwalk_medium2

Crazy4CrochetMomma’s Bohemian Chic Purse

3374754D-565E-4D33-80C6-1DEE690F3FFF_medium2

Crochet by Ellen’s Side Saddle Bag

IMG_2426_edited

Life and Yarn’s Kagan Boho Crossbody

Kagan_Boho_Crossbody_1_medium2

Wildwooddesignsme ‘s Deco Tote

31791634_10155770418648650_3216355674871037952_n_medium2

Happy Hooking!

Ellen Bergmann

Designer at Crochetbyellen.com

Bubble Basket (Easter Mod)

**This Post Contains Affiliate Links**

Pinterest Easter

img_7018-1

PIN it on PINTEREST!

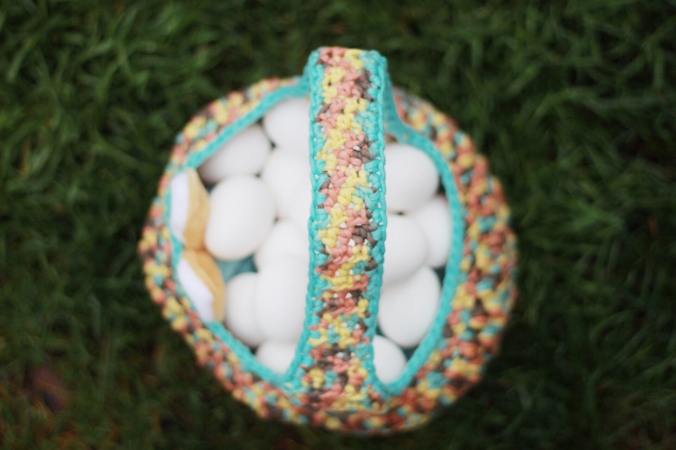
The Easter basket modification of the Bubble Basket is here!

Just in time for a quick holiday make, this crochet Easter basket works up quick.

As always, You can buy the Ad Free PDF in my Ravelry Store!

IMG-3520

I’ve teamed up with 11 designers to bring you more fun and Free Easter makes for a Blog hop! Enjoy a free pattern every day this week as a part of the Bunny Blog Hop. Keep checking back for the links to go live!

Sunday, April 7th – 3amgracedesigns – Easter Peep Kawaii Cuddler

IMG-3522

Monday, April 8th – Hooked Hazel – Easter Sunday Shawlette

IMG-3524

Monday, April 8th – Evelyn and Peter – The Beehive Bag

IMG-3525

Tuesday, April 9th – Divine Debris

Wednesday, April 10th – Life and Yarn

Wednesday, April 10th – Crazy4CrochetMomma


Thursday, April 11th – Hooked On Tilly

Thursday, April 11th – Taylor Lynn Crochet

Friday, April 12th – A Crafty Concept

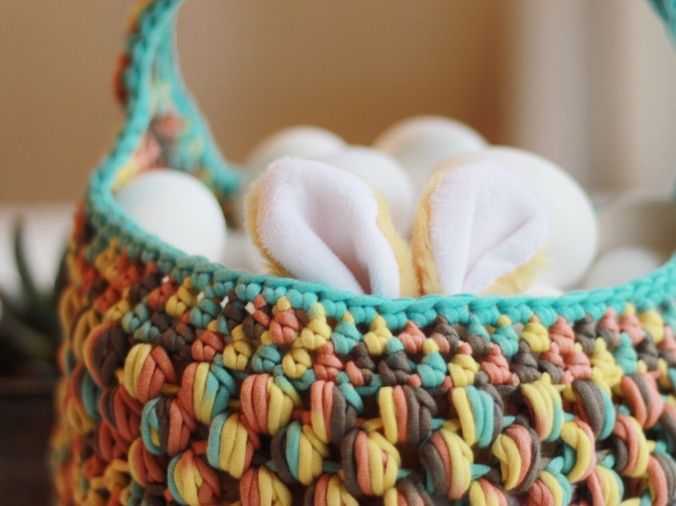
Crochet Easter Basket

Materials Needed:
• J (6.0 mm) crochet hook
200 yards of Bernat Maker Home Dec or other Bulky 5 weight yarn (yardage will vary for other brands) I used an accent color for the handle edging.
• Stitch marker
• Yarn needle
• Measuring tape

Key:
mc: magic circle

sc: single crochet

sl st: slip stitch

hdc: half double crochet

hdc-blo: half double crochet back loop only

hdc dec: half double crochet decrease

ps: puff stitch

st(s): stitch(es)

ch-sp: chain space(#): Stitch counts at end of row
Skill level: Beginner
Size: Finished basket should measure approximately 26 inches in circumference and 7 inches tall
Gauge: My 4” square is 11 rows of 13 hdc.

Special Stitch:
Puff Stitch: Yarn over, insert hook into st, yarn over, pull up a loop, (3 loops on hook) yarn over, insert hook into same st, pull up a loop (5 loops on hook), yarn over, insert hook into same st, pull up a loop (7 loops on hook) yarn over, pull through all 7 loops to create puff st.
Notes: This basket is worked in rounds, so it is essential to mark the beginning stitch of each round with a stitch marker. You will notice that the increases at the base of the basket are staggered. This is to keep the shape as round as possible.
Ready? Here we go!

IMG-3516

Base of the Basket:

Round 1: Hdc 10 in Mc. (10) (mark first st with st marker and move to first st of each row throughout the rest of the pattern to keep your place)Round 2: 2 hdc in each st around (20)
Round 3: **2 hdc in first st, hdc in next** Repeat around. (30)
Round 4: ** hdc, 2hdc, hdc** Repeat around. (40)
Round 5: **2 hdc in first st, hdc in next 3 sts** Repeat around. (50)
Round 6: ** hdc in first 2 sts, 2hdc, hdc in next 2** Repeat around. (60)
Round 7: **2 hdc in first st, hdc in next 5 sts** Repeat around. (70)

Round 8: ** hdc in first 3, 2hdc, hdc in next 3** Repeat around. (80)
The base of your basket should be approximately 7 ½ inches in diameter. If your work is “wavy” you can tug on it to shape it and flatten it. It will straighten out as you continue with the body of the basket.

IMG-3515

Body of the Basket:

Round 9: Hdc-blo in each st around (80)
Round 10: Ch 1, skip first st, ps in next st **ch 1, skip st, ps in next st** Repeat around. (80, or 40 puff sts)
Round 11: Ch 1, ps in first ch-sp from previous round, **ch 1, skip ps, ps in ch-sp** Repeat around. (80)
Round 12: Ch 1, skip first ps, ps in ch-sp **ch 1, skip ps, ps in ch-sp** Repeat around. (80, or 40 puff sts)
Round 13: Hdc in next 20 sts, hdc dec, hdc to end of round until there are 2 sts left. Hdc dec in last 2 sts. (78)
Round 14: Hdc in first 10 sts, hdc dec, hdc in next 30 sts, hdc dec, hdc to end of round. (76)

Round 15: Hdc in next 20 sts, hdc dec, hdc to end of round until there are 2 sts left. Hdc dec in last 2 sts. (74)

Round 16-20: Repeat rounds 10-15 see st counts below.
16-18 (74 or 37 puff sts)

19- (72)

20- (70)

Do not break yarn, continue to handle.

Handle

Row 1: Hdc 10. Turn.

Row 2: Ch 1, Hdc across. Turn. (10)

Row 3: Ch 1, skip st, hdc until 2 sts remain, skip st, hdc in last st. (8)

Row 4: Ch 1, Hdc across. Turn. (8)

Row 5: Ch 1, skip st, hdc until 2 sts remain, skip st, hdc in last st. (6)

Row 4: Ch 1, Hdc across. Turn. (6)
Row 5: Ch 1, skip st, hdc until 2 sts remain, skip st, hdc in last st. (4)

Row 6-29: Ch 1, Hdc across. Turn. (4)

Row 30: Ch 1, 2 hdc in first st, hdc to last st, 2hdc in last st. (6)

Row 31: Ch 1, Hdc across. Turn. (6)

Row 32: Ch 1, 2 hdc in first st, hdc to last st, 2hdc in last st. (8)

Row 33: Ch 1, Hdc across. Turn. (8)

Row 34: Ch 1, 2 hdc in first st, hdc to last st, 2hdc in last st. (10)

Row 35: Ch 1, Hdc across. Turn. (10)

Finish off, leaving a long tail for sewing the handle to the other side of the basket.

Place unattached edge of the handle on the opposite side of the basket and seam to the brim using your preferred seaming method.
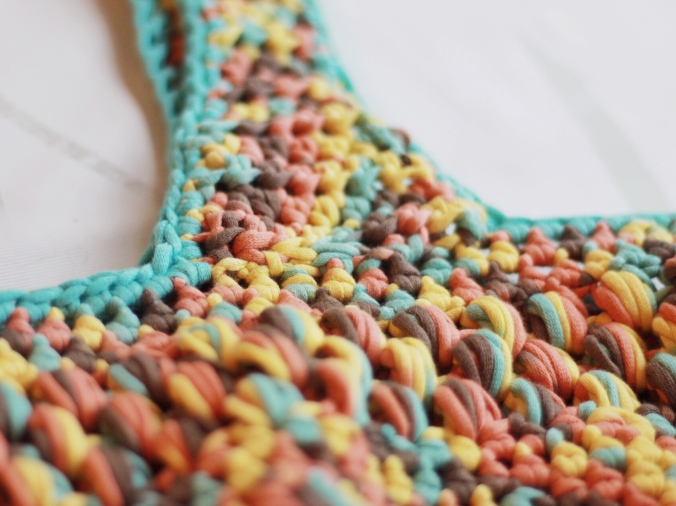
IMG-3518

Handle Edging

*Repeat instructions for both edges of the handle.

Attach yarn (I used an accent color) to the left edge side of the handle where the handle and basket intersect.

IMG-3519

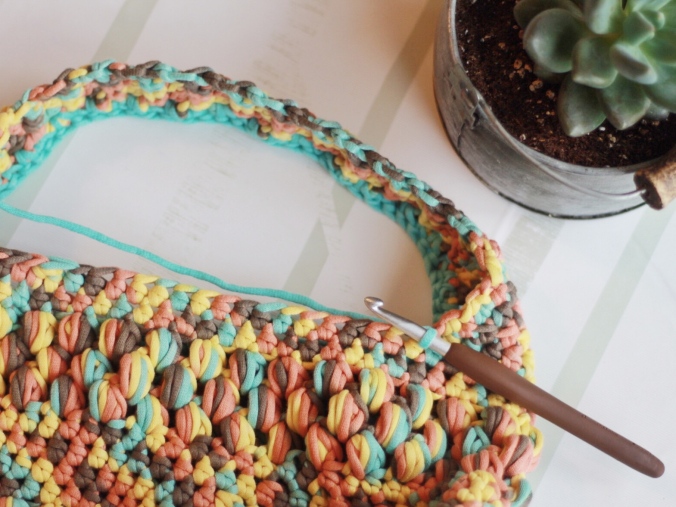
Ch 1, sc across the rim of the basket and around the edge of the handle. Join to first st with a sl st.

Finish off and weave in all ends.

Fill your basket with some of my favorite Easter treats!

LEGO Holiday Easter Egg Hunt Building Kit

MARS Chocolate & More Easter Spring Candy Variety Mix 35.8-Ounce 110-Piece Bag

Pete the Cat: Big Easter Adventure

36 Pieces Shiny Golden Metallic Easter Eggs 2 3/8″ in Gold Color for Filling Specific Treats, Easter Theme Party Favor, Easter Hunt, Basket Stuffers Fillers, Classroom Prize Supplies by Joyin Toy

Happy Easter, Everyone!

Sincerely,

Ellen

Team Colors Cowl

**This post contains affiliate links**

Represent your favorite team or house with the team colors cowl.

Customize it with your favorite bulky yarns.

As always, you can grab the ad free version at a discounted price  . Or view the pattern in the post below!


Team Colors Cowl Pinterest

img_7018-1

Get Your 1st Month of Yarn Club Free

Method:

Knitting

IMG-0775
Materials:

• US 15 (10 mm) Needles

OMBRE KNITTING NEEDLES & CROCHET HOOKS

• 200 Yards MC 75 Yards CC
Bulky 5 weight yarn
Sample made in Premier Serenity Chunky
• Yarn needle
• Measuring Tape

Key:

CO: Cast on
K: Knit
P: Purl
MC: Main Color
CC: Contrasting Color
(#): Stitch counts at end of row

SARI SILK MEDLEY SCARF

Skill level:

Easy

CLOTHING & YARN SALE

Size:

Adult. 17 inches tall x 30 inches in circumference
Gauge: 4-inch by 4-inch swatch is 9 sts x 13 rows of garter stitch.

CHIFFON RIBBON OMBRE PACKS + FREE WOODEN YARN BOWL

Notes:

This cowl is worked as a flat piece and then seamed together with a simple mattress stitch at the end.
Alternatively, you may use whatever binding off method suits you.
I used a long tail cast on method.
For any questions please email me at crochetbyellen@gmail.com. I’m happy to help

IMG-0776

Team Colors Cowl

CO 40 in MC
R1: K1 in each st across (40)
R2. P1 in each st across (40)
R3-14. Repeat R-1-2
R15-20. Repeat R-1-2 in CC
R20-25. Repeat R-1-2 in MC
R26-30. Repeat R-1-2 in CC
Repeat Rows 1-30 twice for a total of 90 rows.

MYSTERY YARN GRAB BAG

BO and seam together first and last rows with a mattress stitch.
Break Yarn and weave in ends.

SARI SILK MEDLEY SCARF

**Please do not edit or alter this pattern in any way. Do not share or sell this pattern. You may sell items using this pattern but please, credit my shop by using any of my above links for Facebook or Etsy, or by using my Instagram handle, @crochet.by.ellen Tag me in your photos and use #teamcolorscowl for a chance to have your work featured. Thank You!

CHIFFON RIBBON OMBRE PACKS + FREE WOODEN YARN BOWL

Find Me!
Crochetbyellen.com
Ravelry.com/stores/crochet-by-ellen
Instagram.com/crochet.by.ellen
Facebook.com/crochetbyellen
Pinterest.com/crochetbyellen

Free and Easy Fingerless Gloves

**This post contains affiliate links**

How about an easy one skein wonder to complete the gifts on your list this season?
These beauties work up super fast while still showing off that luxurious look.

As always, you can grab the ad free version at a discounted price  . Or view the pattern in the post below!

fing glo pin
img_7018-1

“Free and Easy Fingerless Gloves”

SHORELINE PURSE KNIT & CROCHET PATTERN

Materials:

• K (6.5 mm) crochet hook
• 110 yards of Bulky (5) Weight Yarn. Sample made in We are Knitters, The Petite Wool in Pearl Grey.
• Yarn needle
• Measuring Tape

CHIFFON RIBBON OMBRE PACKS + FREE WOODEN YARN BOWL

Key:

ch: chain
hdc: half double crochet
sc blo: single crochet back loop only
sl st: slip stitch
st(s): stitch(es)
RS: Right Side
(#): Stitch counts at end of row
Skill level: Beginner
Size: Adult.
Gauge: Using the K (7.0mm) hook, a 4×4 inch swatch is 7 rows of 12 hdc sts

Notes:

Chain at beginning of each row does not count as a st.
For any questions please email me at crochetbyellen@gmail.com. I’m happy to help!

Processed with VSCO with s2 preset

*Left Glove*
Foundation: Chain 31
Row 1: Hdc in 2nd ch from hook and in each ch to end of row. Turn. (30)
Row 2: (RS) Ch 1, sc in first st, sc-blo in next 28 sts, sc in last st. Turn. (30)
Row 3: Ch 1, hdc in each st across. (30)
Row 4-5: Repeat Rows 2-3 (30)
Row 6: Ch 1, sc in first st, sc blo in next 5 sts. Ch 5, skip 5 sts, sc blo in next 19 sts, sc in last st. (30)
Row 7: Ch 1, hdc in first st and next 19 sts. Hdc in each of the 5 ch sts, hdc in next 5 sts. (30)
Row 8: (RS) Ch 1, sc in first st, sc-blo in next 28 sts, sc in last st. Turn. (30)
Row 9: Ch 1, hdc in each st across. (30)
Row 10-21: Repeat rows 8 and 9

Seam

Align the foundation row and row 21 with the WS facing each other.
Ch1, sl st through sts in both rows to seam. (30)
Break yarn and weave in ends.

Processed with VSCO with s2 preset
*Right Glove*
Foundation: Chain 31
Row 1: Hdc in 2nd ch from hook and in each ch to end of row. Turn. (30)
Row 2: (RS) Ch 1, sc in first st, sc-blo in next 28 sts, sc in last st. Turn. (30)
Row 3: Ch 1, hdc in each st across. Turn. (30)
Row 4-15: Repeat Rows 2-3 (30)
Row 16: Ch 1, sc in first st, sc blo in next 5 sts. Ch 5, skip 5 sts, sc blo in next 19 sts, sc in last st. Turn. (30)
Row 17: Ch 1, hdc in first st and next 19 sts. Hdc in each of the 5 ch sts, hdc in next 5 sts. Turn (30)
Row 18: (RS) Ch 1, sc in first st, sc-blo in next 28 sts, sc in last st. Turn. (30)
Row 19: Ch 1, hdc in each st across. (30)
Row 20-21: Repeat rows 8 and 9

Seam

Align the foundation row and row 21 with the WS facing each other.
Ch1, sl st through sts in both rows to seam. (30)
Break yarn and weave in ends.

Processed with VSCO with s2 preset
***Please do not edit or alter this pattern in any way. Do not share or sell this pattern. You may sell items using this pattern but please, credit my shop by using any of my links for Facebook or Etsy, or by using my Instagram handle, @crochet.by.ellen Tag me in your photos and use #freeandeasyfingerlessgloves for a chance to have your work featured. Thank You!

Find Me!
Crochetbyellen.com
Ravelry.com/stores/crochet-by-ellen
Instagram.com/crochet.by.ellen
Facebook.com/crochetbyellen
Pinterest.com/crochetbyellen

Everyday Chunky Beanie

**This post contains affiliate links**

Sometimes I just want a quick make that is functional and pleasing to the eye. I whipped up this beauty in less than an hour and I have to say, I’m pretty happy with the result!

As always, you can grab the ad free version at a discounted price . Or view the pattern in the post below!

Everyday Pin

img_7018-1

The Everyday Chunky Beanie

Materials:

• L (8 mm) crochet hook
• 90 yards Super Bulky Yarn- Sample made in Lionbrand HometownUSA
• Yarn needle
• Measuring Tape

Key:

ch: chain
dc: double crochet
dc-blo: double crochet back loop only
hdc: half double crochet
hdc-blo: half double crochet back loop only
sl st: slip stitch
st(s): stitch(es)
(#): Stitch counts at end of row

Skill level:

Easy

Size:

Adult. Approx. 20-23 inch head circumference.

Gauge:

4-inch by 4-inch swatch is 11 sts x 8 rows of sc

Notes:

Chain at beginning of each row does not count as a st.
Size of hat can be easily adjusted by adding or subtracting rows to the brim and hat body.
For any questions please email me at crochetbyellen@gmail.com. I’m happy to help!

IMG_2384_edited

Brim

Foundation: Ch 9
Row 1: Hdc in 2nd ch from hook an in each across. (8)
Row 2-28 : Ch 1, turn. Hdc-blo in each st across. (8)
Fold brim in half and seam together with sl st.

Hat Body

Round 1: Ch 1, sc 42 evenly around edge of brim. Join to first st with sl st. (42)
Round 2: Ch 2, dc in each st around. Join to first st with sl st. (42)
Round 2-7: Ch 2, dc-blo in each st around. Join to first st with sl st. (42)

Closing the top of your hat

Finish off yarn and leave a long tail. Using yarn needle, weave tail through every other st in round 7. Cinch top closed. Weave several times through center to secure.

IMG_2380_edited

***Please do not edit or alter this pattern in any way. Do not share or sell this pattern. You may sell items using this pattern but please, credit my shop by using any of my above links for Facebook or Etsy, or by using my Instagram handle, @crochet.by.ellen Tag me in your photos and use #everydaychunkybeanie for a chance to have your work featured. Thank You!

Planning to make this design?

Comment with your favorite bulky yarn below!

Until next time,

Ellen

5 Favorite Crochet Earwarmers


headband roundup

Pin it on Pinterest!
img_7018-1


Everything you need to knit, crochet, spin and weave at Craftsy.com

Hi Friends!

Whether it’s for yourself, a gift or craft show prep, the crochet ear warmer headband is a timeless style that works up quick and is sure to please.

These 5 Ear warmers are favorites of mine and are a must-have for your pattern collection.

1. Essential Earwarmer by CrochetbyEllen

BarleyBootcuffs_EllenBergmann_BioPic

2. Anna Earwarmer by HookedHazel

annaearwarmer_medium

3. Twisty Turban by Crazy4CrochetMomma

1E389D7E-4DF2-430B-A381-11327BC524D4_medium2

4. Alice Earwarmer by TeaganandLu

E172007E-610B-4048-B9EA-A98EF2B4BE73_medium2


5. Easy Peasy Lemon Squeezy Headband

1

I hope you enjoy these Patterns as much as I did!

Sign up for my newsletter for more patterns, promos and posts!

Sincerely,

Ellen


Start your FREE 7 Day Bluprint Trial! Dive into thousands of hours of expert taught videos.

Lux Adventure Cowl

Lux Adventuer Pinterest

img_7018-1

When I first laid my hands on the Lux Adventure Recycled Silk Yarn, I was taken back by how unique it was. Soft, full of texture and interest, I knew it was perfect for my first knitting pattern design.

What’s even better is that Darn Good Yarn is an ethical company with a mission to do GOOD. Employing women in third world countries as well as providing sustainable products are just a couple of the amazing attributes of this company.

Both the Kit and FREE Pattern are Available Here!

Click the Photo or the link to snag your kit and download the pattern.

Processed with VSCO with s2 preset

Until Next Time!

Much Love,

Ellen

Brahms Baby Blanket Pattern

Knit-look crochet

img_7018-1

Snag the PDF Version Here —->

Materials:

• K (6.5mm) crochet hook
• 6 Skeins (720 Yards) Lion Brand Baby Soft Boucle or other bulky weight yarn.
• Yarn needle
• Measuring tape

1393094D-F1F2-471D-AA02-2C924DE447D1.JPG

Key:

ch: chain
dc: double crochet
dc blo: double crochet back loop only
ps: puff stitch
sc: single crochet
sl st: slip stitch
st(s): stitch(es)
(#): Stitch counts at end of row
Skill level: Intermediate
Size: 40×40 inches (Receiving Blanket Size)
Gauge: 4×4 inch square of dc is 9 sts by 5 rows.
If your swatch is smaller, increase your hook size. If your swatch is larger, decrease the hook size.

Notes:

Chain at beginning of each row counts as a st.
For any questions please email me at crochetbyellen@gmail.com. I’m happy to help!
Special Stitch Instructions:
Puff Stitch:
Yarn over, insert hook in st, yarn over, pull up a loop (3 loops on hook), yarn over, insert hook in same st, yarn over, pull up a loop (5 loops on hook), yarn over, insert hook in same st, yarn over, pull up a loop (7 loops on hook), yarn over, insert hook in same st, yarn over, pull up a loop (9 loops on hook), yarn over, pull through all 9 loops. (do NOT close puff st with a ch. You will sl st into the same st to finish the st. This is creating a ps edging.

Brahms Baby Blanket

Foundation: Chain 95
Row 1: Dc in 4th ch from hook and in each st to the end of the ch. (92)
Row 2: Ch 3, dc blo in next st and in each st to end of row (last st in top of previous row’s ch 3). (92)
Row 3-44: Repeat row 2. (92)

Edging

Round 1: Ch 1, turn [sc 91 sts along edge until 1 st
remains. 3 sc in last st, rotate 90˚]. Repeat [] along next 3 sides of the blanket. Sl st to first st to join. 91 sts along each side of the blanket + 3 sts in each corner = (376)

Round 2: Ch 1, sc in first 2 sts, [sl st in next st, ps in same st, sl st in same st, sc in next 3 sts] Repeat [] around entire blanket until 1 st remains. Sc in last st. Join to first st with sl st. (376)

Finish off and weave in ends.

Snuggle that baby so tight and never let go!

Much Love,

Ellen

Snag the PDF Version Here —->

***Please do not edit or alter this pattern in any way. Do not share or sell this pattern. You may sell items using this pattern but please, credit my shop by using direct links for Facebook or Etsy, or by using my Instagram handle, @crochet.by.ellen Tag me in your photos and use #brahmsbabyblanket for a chance to have your work featured. Thank You!

Giant Arm Knit Blanket

Have you always wanted to make one of those massive knit blankets but don’t know where to start?

Now you can! AND it’s super easy!!!!

Pin it on Pinterest!

I have a free pattern and video tutorial to share with you!!!!

View the Video Tutorial Here!

View Binding Off Tutorial Here!

Giant Knit Blanket Pattern

Materials:

  • 120+ yards of giant roving yarn
  • Your hands!!!

Skill Level: Easy

Gauge: I make sure each st is about 1.5-2 inches tall.

Pattern:

Foundation: Chain 25

R1: K1 in each ch across.

R2-R25- Repeat R1

Bind Off

Weave in Ends

Now wrap up and enjoy the coziest cuddle session you’ve ever had with your new blanket!

Make sure to sign up for my newsletter to get new free pattern updates!

Much Love!

Ellen